Basic SSH Key Management I Commonly Use
I have only scratched the surface when it comes to the power and convenience of SSH. I am not managing a slew of servers that I have SSH connections for, but it has become more and more an integral part of tech routine. Using github and gitlab, logging into my raspberry pi at home, and an easy way to go from my Linux laptop to desktop has made SSH a very valuable tool.
During my daily YouTube content intake, I came across a video from one of the channels I subscribe to, Lawrence Systems, put out a few videos on SSH. After watching these video, the veil was lifted on the potential of how to use more and more features of SSH.
Generating SSH Keys
I will be using ED25519 to generate my keys in this blog post. Tom, the host of the YouTube video, goes into detail and leaves reference links for using this to generate the key, and it is easier to follow along when you use the same methodology. Lets start the key generation:
ssh-keygen -a 100 -t ed25519 -f ~/.ssh/pi_ed25519 -C "Kalifornia909@pi"
We can break this command down a little to explain some of the options
-a 100
This option is the math randomness while it’s being generated.
-t ed25519
The -t is to choose what you are going to use to generate your key.
-f ~/.ssh/pi_ed25519
This is where you will save your SSH key and it also gives you the option of choose the filename if you want to change it. You can choose to leave this as the default if you want, but I generate a new key for the different connections I use. Overkill, possibly, but it also gives me options to grow and fail. One thing I learned the hard way is to type out the full path of the ~./ssh/. You have to possibility of throwing ssh keys around everywhere and not knowing where they were generated. Then what happens, you generate it again. Only to have the same result. Yes….yes….I have done this.
-C “Kalifornia909@pi”
The -C is for comment. I believe its common practice to put an email address, but I keep this kind of random.
You should receive an output similar to this: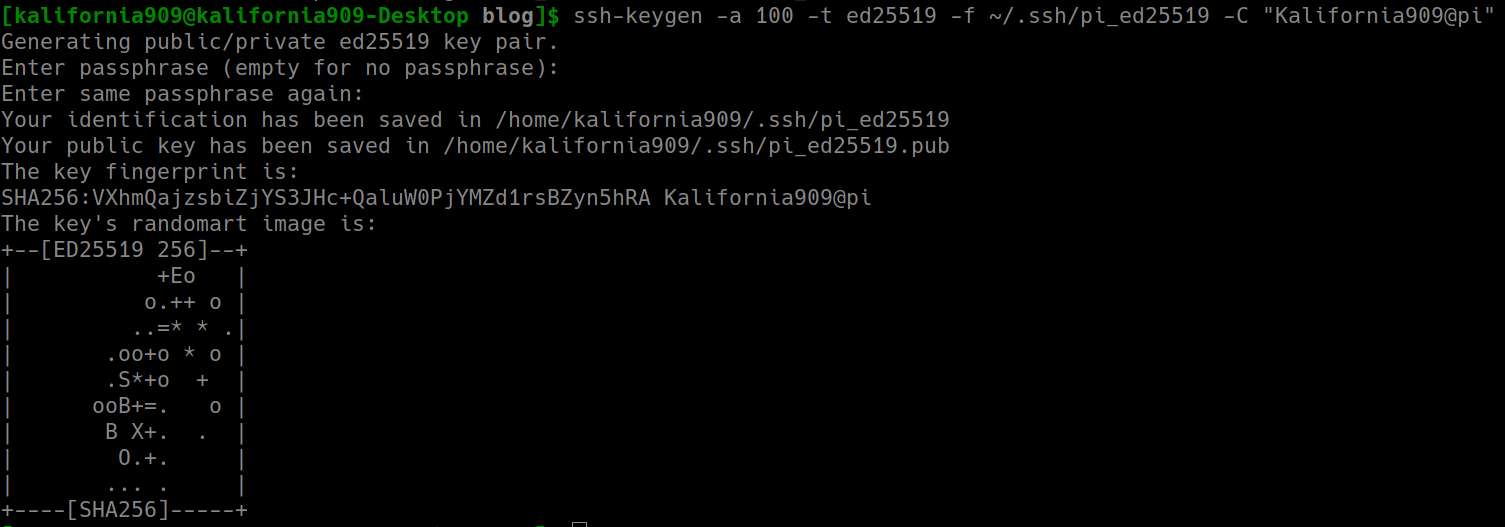
Most of this is self explanatory, and the only thing you will be asked for is your password. You can choose to use a password with this or not, but I do add passwords to my SSH keys.
Now you can verify that the files are there.
ls ~/.ssh
You should see at least two files that look familiar. In this example I have pi_ed25519 and pi_ed25519.pub. The file name that is the .pub is the public key. This key can be utilized everywhere without putting the key pair at risk. This is what you will use for site like github and gitlab. Anyone can have this .pub file. You can use whatever you like to see whats in it, but I keep it simple.
cat ~/.ssh/pi_ed25519.pub
The file that does not end in .pub is your private key, and its meant to be private to that computer. If you cat the wrong file you will get an output that beings with:
—–BEGIN OPENSSH PRIVATE KEY—–
This tells you right away that it is your private key. Do not give this to anyone.
Using Your SSH Key
You did it! You create your first key pair! Now what?
The first thing I am going to do is add that key pair identity.
ssh-add ~/.ssh/pi_ed25519
Next I am going to copy this over to my raspberry pi. You can replace raspberry pi with whatever server you are wanting to use this key pair to connect to.
ssh-copy-id -i ~/.ssh/pi_ed25519 username@ip-address
This will copy your ssh pubic key over to the server. In the example the username@ip-address is for whatever host you are trying to connect to. For example [email protected] would copy your ssh public key over to login whenever you tried to log in with that user name at that IP address.
If you would like a more in-depth explanation, and some great tech videos I have posted the videos that inspired this blog post
Tweaking SSH To Your Liking
Hopefully by now you are able to login to your host easily and securely. Here are some things that you might want to consider.
One thing you might want to try is to prevent the root user from being able to login using SSH. This could be helpful to prevent some brute force attacks once SSH pops up on a scan. I will be using vim to edit the SSHD config file. Use whatever text editor you are comfortable with.
sudo vim /etc/ssh/sshd_config
You want to make sure you are editing the sshd_config because there is a file in the same folder that is named ssh_config. Now to disable the root user from being able to login via ssh.
Find the line in the config file that has
PermitRootLogin
This line might have a # in front of it so it might look like:
#PermitRootLogin
If that is the case you will want to remove the #. You can type yes or no depending on your preference.
Similar to this
Another option in this config file is if you want to allow users to login with a password. Once you have your SSH key on the host you will not being using a password anymore. To make changes to this option you will want to find the line that has
PasswordAuthentication
You can say yes or no depending on if you want to allow for password logins. Similar to this:

Modifying SSH Config File
A SSH config file can help if you have multiple SSH keys and identities, or by running a specific command that you want to run. In the video example, Tom has a SSH connection to a server that will reboot the server without input.One reason I have had to use it was gitlab was checking for default ssh key names and would not let me interact with a repository I have.
Lets dive into it:
vim ~/.ssh/config
There are many options that you can do with this but here is mine that allowed me to connect to github.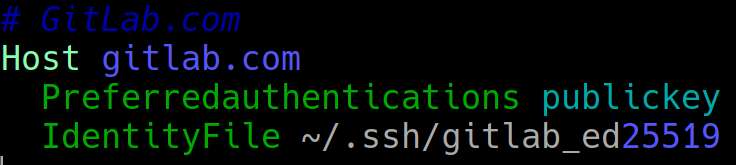
Lets break down what we see here. There is a #Gitlab.com entry. This is commented out with a #; meaning that when this file is processed the computer will skip that line.
The Host is gitlab.com. Pretty self explanatory. However you can replace this with an IP Address of what you are trying to connect to.
The Preferredauthentications is defining that I want to use my public key to connect to this host. My IdentityFile is where my SSH key for this connection is stored.
However what you don’t see but can add is:
Port
User
RemoteCommand
Request TTY
Amongst many others I am sure I am just scratching the surface. The video below goes through a more in depth explanation of this config file.
Please take the time out and check out the videos that inspired this writeup. It is a great tech channel to learn from. I have been subscribed for over a year now and have grown a great deal because of it.